Cloudflare Beginner's Guide: From DNS and SSL to Workers
Cloudflare tutorial for beginners: domain setup, orange vs grey cloud, SSL modes, caching, WAF, Tunnel and Workers free tiers, plus two big outages.
A little after 7 p.m. Taiwan time on November 18, 2025, a lot of websites stopped loading at the same moment and started returning 5xx errors. Cloudflare’s own postmortem later called it its “worst outage since 2019.”
How does one company’s bad afternoon take down so many sites at once? When I opened W3Techs’ statistics page on November 10, it said 28.9% of all websites use Cloudflare as a reverse proxy, which is 86.3% of the sites whose reverse proxy W3Techs can identify. Put another way: among the sites W3Techs tracks, roughly one in every three or four has Cloudflare standing in front of it.
This is written for people touching Cloudflare for the first time, and it runs in four parts. First, what Cloudflare is and what the free plan gets you. Then a deeper look at what actually happens once you connect a domain: DNS, the orange and grey clouds, SSL, and caching. After that, the practical features worth turning on, including the firewall, Tunnel and Workers. Last, a wrap-up and my assessment, including what happens when it breaks.
I checked every price and allowance here against Cloudflare’s official docs and plans page on November 10, 2026. Cloudflare changes things often, so if a number differs by the time you read this, trust the official page.
So what is Cloudflare? The layer that sits in front of your site
The simplest mental model: without Cloudflare, visitors connect straight to your server. With Cloudflare, visitors connect to Cloudflare’s machines first, and Cloudflare fetches what it needs from your server. That setup is called a reverse proxy, and Cloudflare’s docs call your server the “origin.”
Sitting in the middle buys you a few things right away:
- Attack blocking: malicious traffic gets stopped at Cloudflare and never reaches your server.
- Caching: files that rarely change, like images, CSS and JS, can be stored in Cloudflare’s data centers, so visitors get them from somewhere nearby instead of going back to your server every time.
- Free HTTPS: Cloudflare issues the certificate and renews it automatically.
- A hidden server IP: anyone looking up your domain sees Cloudflare’s IPs.
Cloudflare’s network page says 95% of the world’s Internet-connected population is within 50 milliseconds of a Cloudflare data center, and that it interconnects with more than 13,000 carriers, cloud providers and enterprise networks. The city counts on that same page contradict each other, so I’m leaving them out.
Descriptions only go so far, so I ran a lookup myself. From Taiwan, I queried DNS for Cloudflare’s own docs site, developers.cloudflare.com, and got five IPs starting with 104.16.x.189, all with a TTL of 300 seconds. Then I checked the response headers with curl: Server said cloudflare, and the CF-RAY header ended in TPE one time and KHH the next, meaning a Taipei data center answered one request and a Kaohsiung one answered the other. On any site behind Cloudflare, adding /cdn-cgi/trace to the address shows which data center you reached (the colo= line).
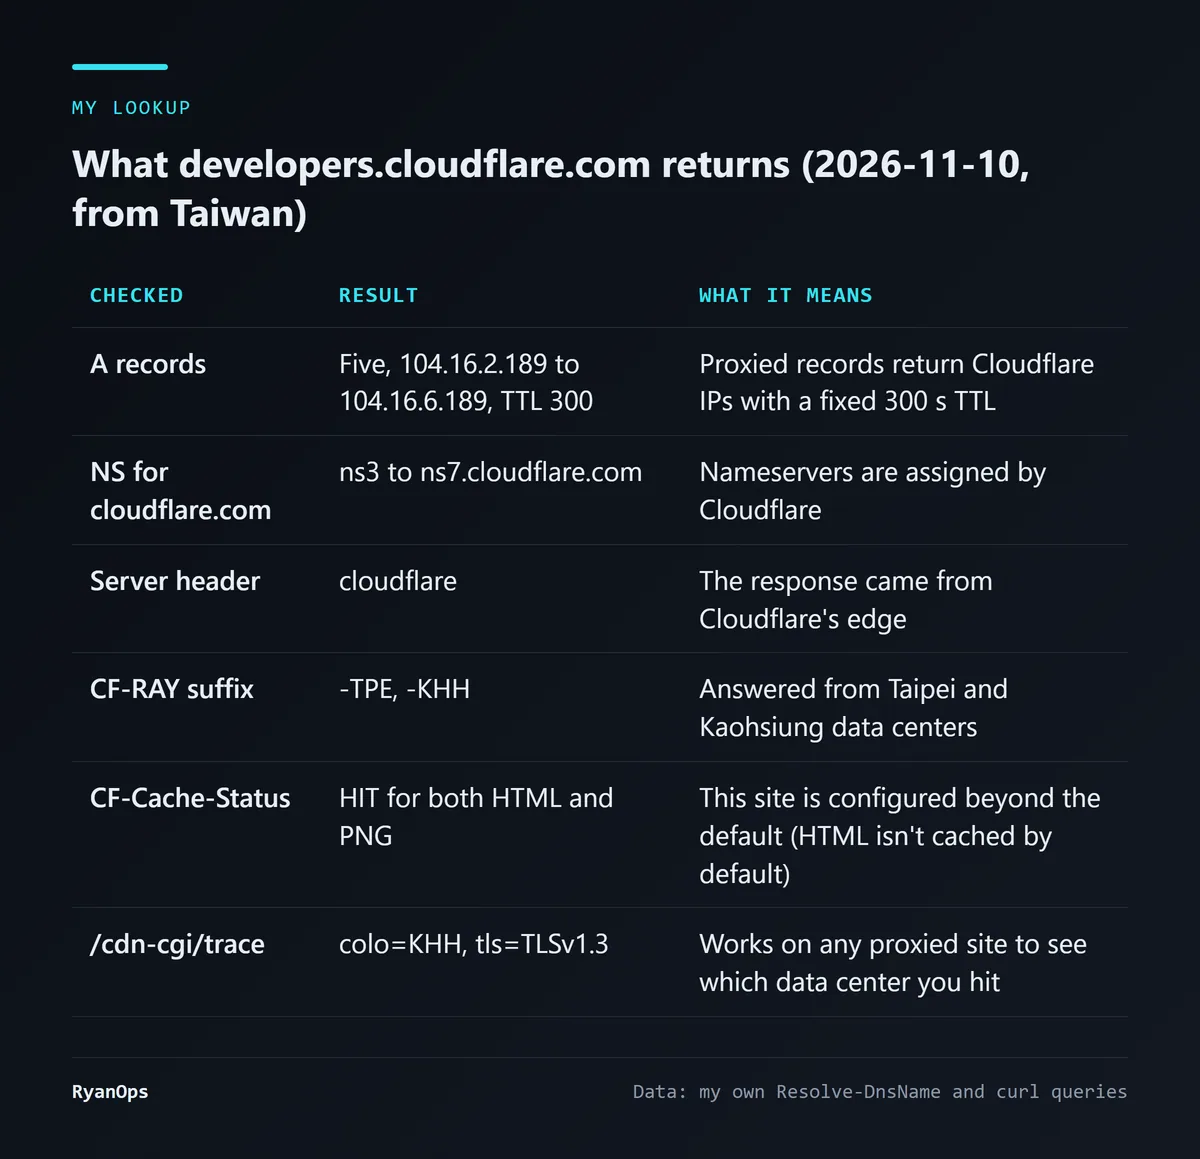 Figure: what I saw querying developers.cloudflare.com from Taiwan on 2026-11-10 (data: my own Resolve-DnsName and curl queries)
Beyond proxying websites, Cloudflare has stretched its product line a long way in recent years: Workers lets you run code in its data centers, R2 is object storage, D1 is a database, Tunnel puts home services online without opening ports, and there’s domain registration and email forwarding too. I’ll go through each of these below.
What does the free plan give you, and what’s missing?
For website proxying, Cloudflare’s plans page lists four tiers: Free; Pro at $20 a month billed annually or $25 billed monthly; Business at $200 a month billed annually or $250 billed monthly; and a top tier called Contract (enterprise), priced by negotiation.
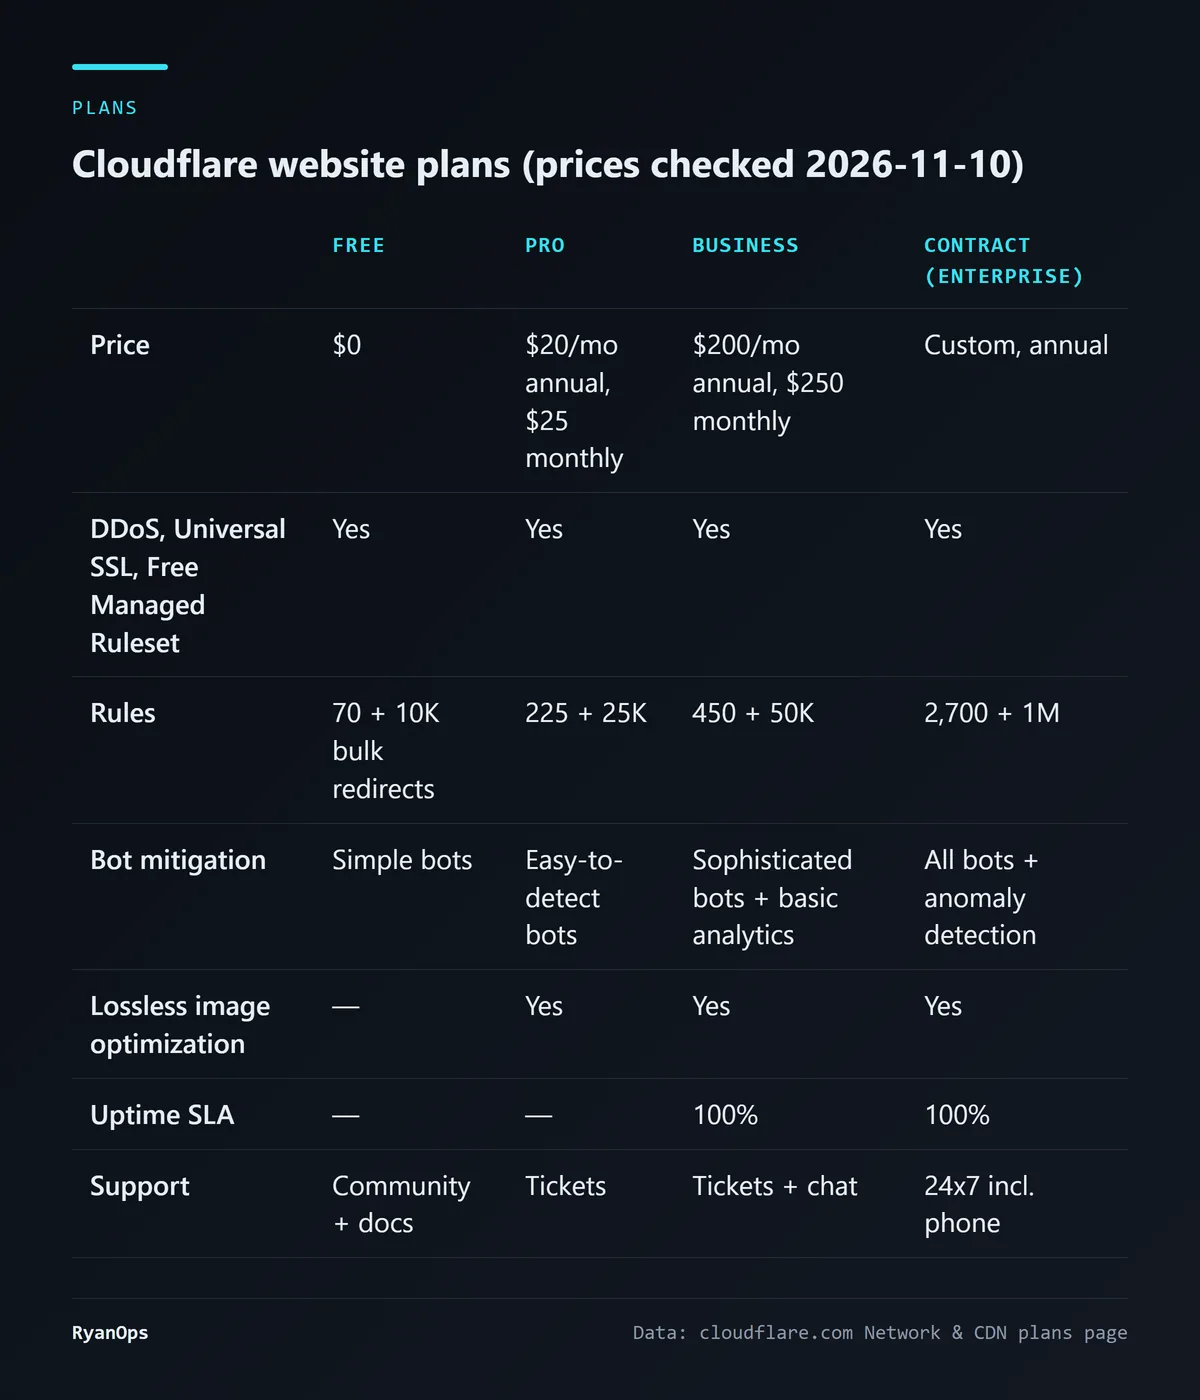 Figure: Cloudflare website plans, prices checked 2026-11-10 (data: the Network & CDN tab of Cloudflare’s plans page)
What all four plans share is exactly what a beginner needs most: unmetered DDoS protection, a free Universal SSL certificate, the Free Managed Ruleset, and a web application firewall (WAF). The two things beginners worry about most, getting attacked and not having HTTPS, are handled on the free plan.
So what’s missing on Free? Going by the plans page, the differences come down to these:
- Rules: Free gets 70 rules plus 10,000 bulk redirects; Pro gets 225. A personal site usually won’t run out.
- Bot mitigation: Free only handles “simple bots.” You need Business to stop sophisticated scrapers and automation tools.
- Image optimization: lossless image optimization starts at Pro.
- SLA: neither Free nor Pro has an uptime guarantee. Business gets a 100% SLA with service credits.
- Support: Free gets community forums and docs only. Tickets start at Pro.
My own view is that the last two are the real dividing line. Feature-wise, Free is more than enough for a personal blog, a portfolio or a small project. But if your site going down means losing money directly, Free leaves you with nobody to call when something breaks. You just wait. I’ll come back to this in the outage section.
When you hand your domain to Cloudflare, what actually changes?
This is the step where beginners get stuck most, because it isn’t just a few clicks inside Cloudflare. You also have to go back to wherever you bought the domain and change a setting there.
Cloudflare’s docs call this a “full setup”: you switch your domain’s nameservers to Cloudflare’s. The docs are clear that this is the most common setup, and the only one available on the Free and Pro plans.
According to the official docs, the steps go like this:
- Add the domain in Cloudflare: in the dashboard, choose “Onboard a domain,” enter the apex domain (say
example.com, no www), and pick a plan. - Review the DNS records: Cloudflare scans your existing records and imports them. Go through every single one here, especially www, subdomains, and anything email-related (MX, plus TXT records like SPF and DKIM). Miss one, and that service breaks after the switch.
- Change the nameservers at your registrar: get the two nameservers from your domain’s Overview page in Cloudflare, log in to wherever you bought the domain, remove the old nameservers, and put Cloudflare’s two in their place. Cloudflare assigns them; you can’t pick your own.
- Wait for it to take effect: the docs say the registrar update can take up to 24 hours.
- Turn DNSSEC back on: once the domain is active, re-enable DNSSEC from the Cloudflare side.
Step 3 has a trap the docs call out specifically: if DNSSEC is on at your registrar, turn it off before you change nameservers, or your domain may stop resolving entirely. DNSSEC adds signatures to DNS answers, and the key registered upstream still belongs to your old DNS provider, so once the nameservers change, the signatures no longer match and resolution fails.
What is a nameserver, anyway? Think of it as your domain’s switchboard. When someone wants example.com, they first ask the switchboard what IP the domain points to. Switching to Cloudflare’s nameservers hands the switchboard to Cloudflare. From then on, you edit every DNS record in Cloudflare’s dashboard, and whatever DNS settings you had at your registrar stop mattering.
If you bought the domain through Cloudflare Registrar, you can skip steps 3 and 4, since it already uses Cloudflare’s nameservers.
Orange cloud vs grey cloud: the switch that decides whether Cloudflare is helping you
On the DNS settings page, every record has a little cloud next to it. I think this is the single most important switch in Cloudflare, and the most misunderstood.
- Orange cloud (Proxied): traffic goes through Cloudflare. Anyone looking up the name gets Cloudflare’s anycast IPs and can’t see your server’s real IP. Caching, the firewall, DDoS protection and HTTPS certificates all only work under the orange cloud.
- Grey cloud (DNS only): Cloudflare just answers DNS queries, returning your server’s real IP, and website traffic doesn’t pass through Cloudflare. At that point Cloudflare can’t help you with anything, and it can’t show you website traffic analytics either, only DNS query data.
A few rules from the docs worth remembering:
- Only A, AAAA and CNAME records can be proxied, and only for services running HTTP or HTTPS. Records like MX and TXT are always DNS-only.
- When you onboard a domain through the dashboard, proxying is on by default.
- Proxied records have a fixed TTL of Auto, which is 300 seconds, and you can’t change it. That’s the TTL of 300 I saw in my lookup above.
- For email, domain verification and non-web services, the docs recommend grey cloud. Some third-party CNAME targets (the docs name certain Mailchimp, Zoho, Amazon SES and Microsoft addresses) simply stop connecting if you proxy them.
- Websites on non-standard ports, or services running over TCP or UDP (a game server, say), aren’t supported by the regular proxy. You need Spectrum, which is paid.
What follows is my own inference, not something the docs say: the orange cloud’s “hidden server IP” is easy to give away. The most common case is that you proxy www, but mail.example.com or some test subdomain is grey-clouded and points at the same server. Anyone who looks up that grey record gets your real IP and can hit your server directly, bypassing Cloudflare. The docs also mention that while a newly added domain is still pending (up to 24 hours), proxied records temporarily behave like grey ones and return the real IP.
So if you care about your server IP being visible, the safer approach is to put web and mail on different servers, or use Tunnel (covered below) so your server doesn’t need a public IP at all.
Why do SSL modes send your site into a redirect loop?
Under Cloudflare, HTTPS is really two connections: one from the visitor to Cloudflare, and one from Cloudflare to your server. The SSL/TLS mode decides whether each of those is encrypted.
Cloudflare’s current default is Automatic SSL/TLS: it scans your server and picks the most secure mode the server supports. The docs say it “will not change your setting to a less secure encryption mode,” and it scans roughly once a month. But it’s still being rolled out gradually, and domains that haven’t been migrated yet only see the manual (Custom) options:
- Off: neither connection is encrypted; everything is plain HTTP.
- Flexible: HTTPS from the visitor to Cloudflare, unencrypted HTTP from Cloudflare to your server. Meant for servers that can’t have a certificate at all.
- Full: HTTPS on both legs, but Cloudflare doesn’t check whether your server’s certificate is valid. A self-signed certificate passes.
- Full (strict): HTTPS on both legs, and Cloudflare validates your server’s certificate, which has to come from a public certificate authority or be a Cloudflare Origin CA certificate.
- Strict (SSL-Only Origin Pull): whether the visitor uses HTTP or HTTPS, Cloudflare always connects to your server over HTTPS and validates the certificate.
Cloudflare’s own wording is that, if possible, it “strongly recommends” Full or Full (strict).
The problem beginners hit most is the browser saying “too many redirects” (ERR_TOO_MANY_REDIRECTS). Cloudflare’s troubleshooting doc lays out the cause plainly: you’ve chosen Flexible, so Cloudflare connects to your server over HTTP. But your server is set to “redirect all HTTP to HTTPS,” so it tells Cloudflare to use HTTPS. Following the Flexible rules, Cloudflare connects over HTTP again, and the server redirects again… forever. If your site software or hosting panel has a “force HTTPS” option and it’s on, pairing it with Flexible will do this.
The docs give two fixes: remove the HTTPS redirect on your server, or switch to Full or higher (which requires a certificate on your server). It breaks the other way too: on Full or Full (strict), if your server redirects HTTPS back to HTTP, you get the same loop.
Where does the server’s certificate come from? If your server only accepts traffic coming through Cloudflare, the easiest option is a Cloudflare Origin CA certificate. It’s free on all four plans, and once it’s installed you can use Full (strict). Two things to know, though:
- Only Cloudflare trusts this certificate; browsers don’t. If you ever pause Cloudflare or switch the record to grey cloud, visitors will see an untrusted-certificate error.
- The docs state that Cloudflare doesn’t send expiration notices, so you have to track the expiry date yourself.
Finally, the certificate on the visitor side: Universal SSL. As soon as your domain is active, Cloudflare automatically issues a free certificate covering the apex domain (example.com) and first-level subdomains (www.example.com, blog.example.com). Anything deeper, like api.dev.example.com, isn’t covered by Universal SSL; you’d need an advanced certificate option like Advanced Certificate Manager (from $10 a month, per the plans page) or Total TLS. Keeping subdomains to one level when you name them saves you this hassle.
Why didn’t your site get faster after turning on Cloudflare?
Plenty of people assume that connecting Cloudflare makes their site faster, then run a speed test and see little difference. The reason is usually this rule from the docs: by default, Cloudflare doesn’t cache HTML or JSON.
It decides what to cache by file extension, not by file type. By default it caches the extensions in the table below, which covers images, video and audio, fonts, CSS, JS, archives and document files. It also caches robots.txt by default.
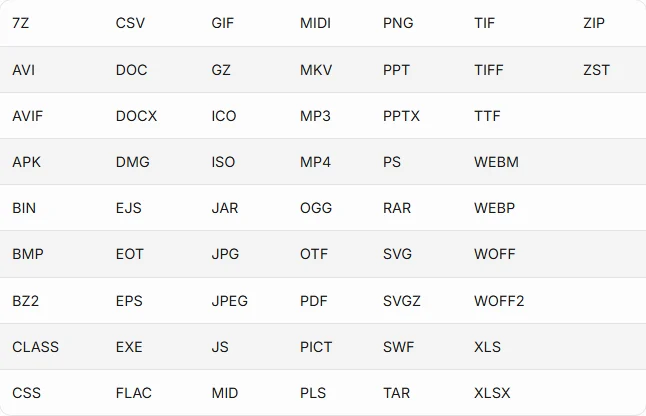 Figure: the file extensions Cloudflare caches by default (source: Default cache behavior)
In other words, your actual pages (the HTML) still come from your server on every request. If your server is slow, or your pages are generated dynamically by PHP, they’ll be just as slow behind Cloudflare. What you save is traffic for images and static files.
To check whether a file is being cached, run curl -I on its URL and look at the CF-Cache-Status header. Per Cloudflare’s docs:
HIT: served from Cloudflare’s cache.MISS: cacheable, but not in the cache this time, so it was fetched from your server.DYNAMIC: Cloudflare decided the request isn’t cacheable, and it “went to the origin web server without a cache lookup.” HTML with no rule set usually shows this.BYPASS: it was eligible for caching, but your server’s response prevented it, for example withCache-Control: private,no-storeorSet-Cookie.
Interestingly, when I checked the developers.cloudflare.com home page, its HTML came back as HIT. That means the site has been configured beyond the default behavior; how exactly, I can’t tell from the outside.
To get HTML cached too, you need Cache Rules. Free allows 10, Pro 25 and Business 50, and the rules only apply to proxied records. Be careful: pages where each person sees different content, like account pages, shopping carts and admin panels, must never be cached, or user A’s page could be shown to user B. Write rules that cache only public pages and exclude logged-in paths.
A few other numbers worth noting:
- Default cache times: 200, 206 and 301 responses are kept for 120 minutes, 302 and 303 for 20 minutes, 404 and 410 for 3 minutes.
- Maximum cacheable file size: 512 MB on Free, Pro and Business; 5 GB by default on Enterprise.
- Upload size limit: 100 MB on Free and Pro, 200 MB on Business. If your site lets users upload videos or large files, Cloudflare will block requests over 100 MB, and beginners run into this a lot.
Protection you get on Free: DDoS, WAF and Turnstile
These three are what I think makes the free plan worth it.
DDoS protection. The docs say plainly that it’s “Available on all plans,” and Free includes unmetered DDoS protection from the network layer to the application layer (L3 to L7), detected and mitigated automatically with no setup on your part. The limits on Free are a single ruleset override and only part of the adaptive protection. For a personal site, that default is enough.
WAF (web application firewall). A WAF inspects request contents and blocks things that look like SQL injection or attempts to exploit known vulnerabilities. The docs have a table showing which managed rulesets each plan gets:
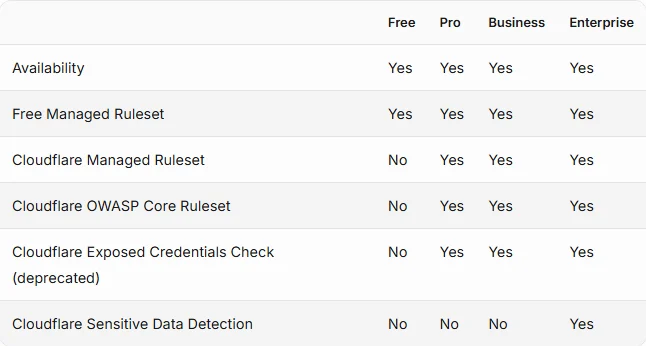 Figure: WAF managed ruleset availability by plan (source: WAF Managed Rules)
Free gets the “Cloudflare Free Managed Ruleset,” which the docs say protects against “high-impact and widely exploited vulnerabilities.” The fuller Cloudflare Managed Ruleset and the OWASP Core Ruleset need Pro or higher.
A WAF helps, but don’t treat it as a substitute for patching. When I wrote about the php2shell vulnerabilities, Cloudflare pushed matching WAF rules the same day, but Cloudflare itself called them “STOPGAP only,” and they only protected traffic that went through Cloudflare. The report in my piece on PaperCut servers breached by AI agents also includes a case where Cloudflare’s WAF blocked an attack, but only because that server actually had Cloudflare in front of it. A rule can stop one attempt; the vulnerability is still there, and the server still needs updating.
Turnstile. This is Cloudflare’s CAPTCHA replacement, used on sign-up, login and comment forms to stop bots. It has three modes: Managed (recommended; decides based on risk whether to show a checkbox), Non-interactive (the visitor never has to do anything) and Invisible (completely hidden). Two things matter here:
- It doesn’t require your site to be proxied through Cloudflare. Any website can embed it.
- On the free plan, challenges are unlimited, with up to 20 widgets per account and up to 10 hostnames per widget.
If your site still uses the kind of CAPTCHA that makes people click on traffic lights, Turnstile is worth the switch.
Put home services online without opening a port: Tunnel
Say you have a NAS at home, or a computer running a small project, and you want it reachable from outside. The traditional way is to open a port on your router and set up forwarding, which amounts to opening an outward-facing door into your home network, and many home connections don’t even have a fixed IP.
Cloudflare Tunnel works the other way around. You install a small program called cloudflared on that machine, and it reaches out to Cloudflare, creating an outbound-only encrypted connection. Visitors connect to Cloudflare, and Cloudflare sends their requests in through that connection. The docs spell it out: you can set your firewall to allow only these outbound connections and block all inbound traffic. Your server doesn’t need a public IP, and your router doesn’t need an open port.
The Tunnel docs mark it as “Available on all plans,” supporting HTTP, HTTPS, TCP, SSH and RDP. You do need a domain that’s already on Cloudflare. The official steps are roughly:
- In the dashboard, go to Networking > Tunnels and click Create Tunnel.
- Pick your operating system and follow the commands on the page to install and run
cloudflared. On Windows, that’scloudflared.exe service install <TUNNEL_TOKEN>run as administrator; on Linux and macOS,sudo cloudflared service install <TUNNEL_TOKEN>. There’s a Docker version too. - Wait for the status to show Healthy.
- In that tunnel, choose Routes > Add route > Published application, enter a subdomain (say
nas.example.com), and set the service URL to the local address, for examplehttp://localhost:80.
For non-web services like SSH and RDP, the connecting side needs cloudflared too.
If you just want to show a friend a site you’re developing locally, there’s an even quicker Quick Tunnel: one line, cloudflared tunnel --url http://localhost:8080, gets you a temporary trycloudflare.com address, no account or domain required. But the docs list its limits: it’s officially meant for testing and development, has no uptime guarantee, gets a new address every time, supports up to 200 in-flight requests at once (more return 429), doesn’t support Server-Sent Events, and by default anyone with the URL can reach your service (you can add the --allowed-mail flag to require an email code instead). Shut it down when you’re done sharing.
If you write code: free tiers for Workers, R2 and D1
This part is for people who write at least a little code. Cloudflare’s developer platform has quite generous free allowances, which makes it a good fit for small projects and personal tools.
Workers is code that runs in Cloudflare’s data centers. You write JavaScript or TypeScript, deploy it, and it runs in data centers around the world. The table on the pricing page shows the free-versus-paid difference most clearly:
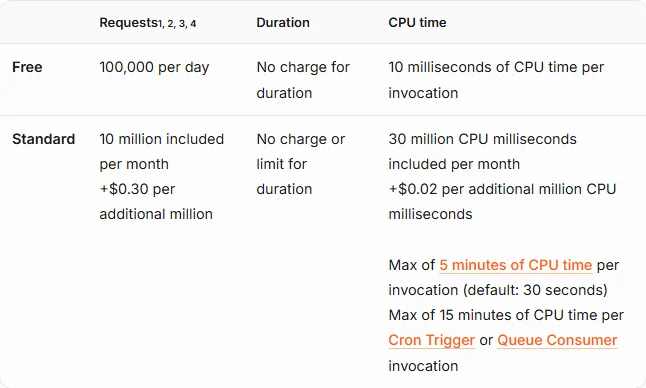 Figure: Workers requests and CPU time on Free vs paid (source: Workers Pricing)
Free gets 100,000 requests a day, with up to 10 milliseconds of CPU time per invocation (time spent waiting on a database or an external API doesn’t count as CPU). Once you exceed the daily allowance, routes set to fail closed return error 1027 (routes set to fail open skip the Worker and go straight to the origin). Paid costs at least $5 a month per account and includes 10 million requests and 30 million CPU milliseconds, with a single invocation allowed up to 5 minutes (30 seconds by default), and no bandwidth charges. Memory is 128 MB per isolate on both.
Another common question: Pages or Workers? The Pages docs now open by asking “Are you sure you want to use Pages?” and describe Workers as Cloudflare’s “primary platform for building applications,” recommending that new projects start on Workers. Pages hasn’t been announced as deprecated, and existing projects still run, but if you’re starting now, follow the official advice and use Workers’ static assets feature. Static asset requests on Workers are free and unlimited, with up to 20,000 files per version on Free and 25 MiB per file. The one exception is a footnote on the pricing page: if you turn on Workers caching, requests served from the cache (static assets included) are billed per request.
When you need to store data, the free allowances for the common services are in this table:
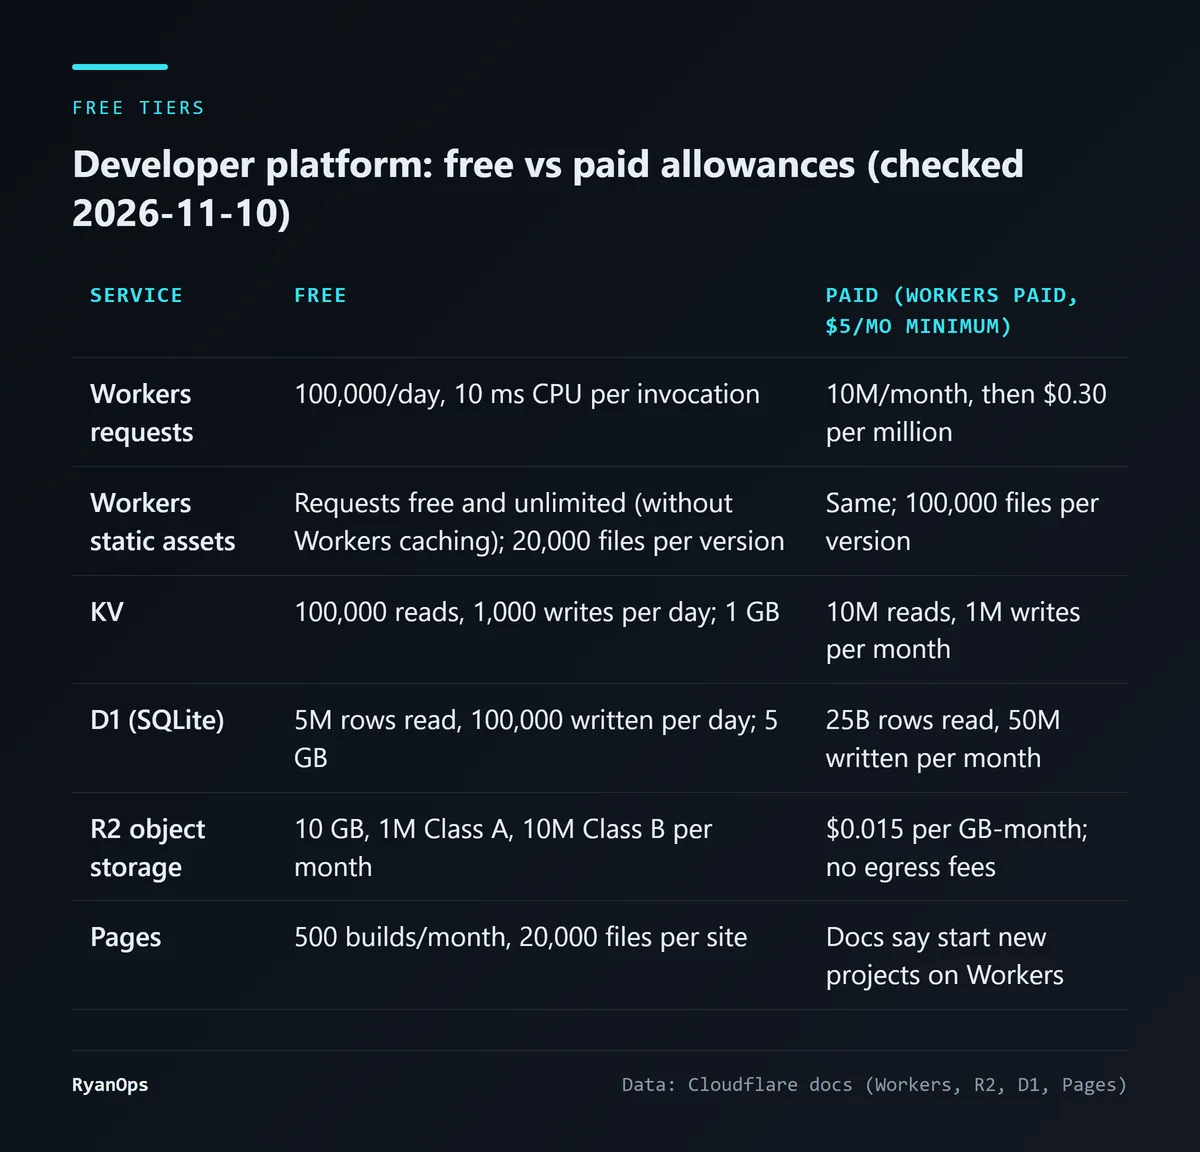 Figure: developer platform free vs paid allowances, checked 2026-11-10 (data: Cloudflare’s R2 and D1 pricing pages and the Workers and Pages limits pages)
A few points worth calling out:
- R2 doesn’t charge for downloads. R2’s docs state that egress to the Internet is “Free,” which is very different from storage services that bill by bandwidth. The free allowance is 10 GB of storage, 1 million Class A operations (uploads, listings) and 10 million Class B operations (reads) per month, then $0.015 per GB-month. That makes it a good deal for images, backups and files users download. Note the free tier only applies to Standard storage, not the Infrequent Access class.
- D1’s free allowance resets daily at 00:00 UTC, which is 8 a.m. Taiwan time. Requests over the limit return errors until the reset or until you upgrade to paid; it doesn’t start charging you.
- KV suits read-heavy, write-light use: Free gets 100,000 reads a day but only 1,000 writes. Great for config and caching; use it as a counter and you’ll run out fast.
- Workers Logs moves to a different pricing scheme on December 1, 2026, so if you use it, keep an eye on the notice on the pricing page.
My advice: start on Free, and upgrade only when you actually hit a daily limit. The $5-a-month paid plan’s allowance is large, and personal projects rarely need more.
Two handy extras: domain registration and Email Routing
Cloudflare Registrar. Cloudflare sells domains “at cost”: the docs say it only charges what the registry charges, with “No markup. No surprise fees,” and renewals are at the registry’s list price. WHOIS information is redacted by default, and DNSSEC is free. If you’ve ever dealt with a registrar that was cheap the first year and suddenly expensive at renewal, Cloudflare renewing at list price is a lot simpler. The plans page lists a starting price of $7.85; the actual price depends on the domain extension.
Email Routing. It lets you receive mail at an address on your own domain (say hi@example.com) and forward it to the inbox you already use, like Gmail, or hand it to Workers for processing. It’s available on the free plan. Be clear on what it covers: it mainly handles receiving and forwarding, and sending is a separate matter. The docs say Email Sending is still in beta, and sending to arbitrary recipients requires Workers Paid. If you want to send mail from your own domain, you’ll still need another email service alongside it.
It breaks too: what two major outages tell you
I’ve covered a lot of upsides, so before wrapping up, let’s be clear about the risk. Cloudflare sits in front of your site. When it has a problem, your site has a problem, whether or not anything is wrong with your server.
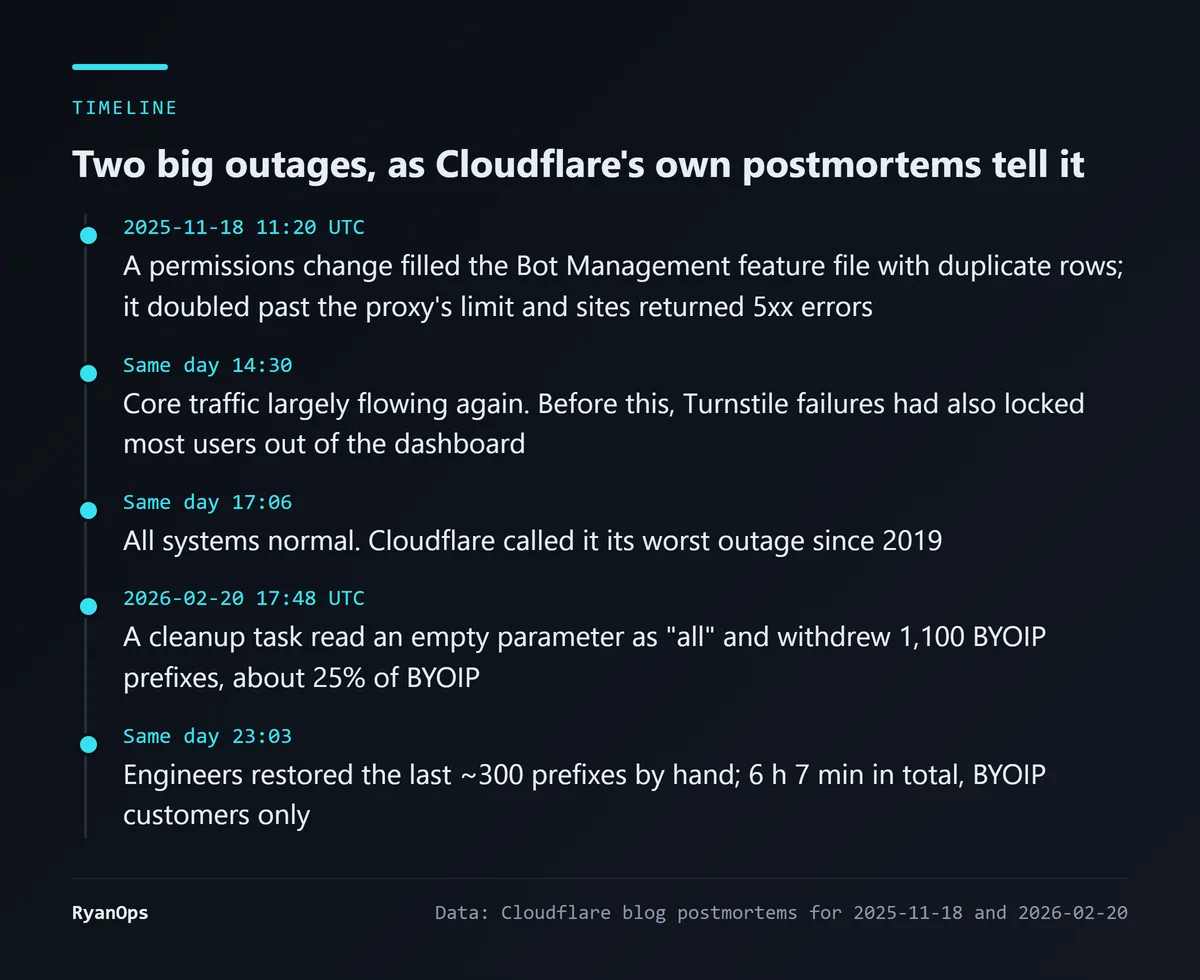 Figure: how the two major outages unfolded (data: Cloudflare blog postmortems for 2025-11-18 and 2026-02-20)
November 18, 2025 had the widest impact. According to Cloudflare’s postmortem, a database permissions change caused the “feature file” used by Bot Management to fill up with duplicate data. The file doubled in size and exceeded a limit set in the proxy software (the limit was 200 features, with only about 60 normally in use), and the proxy failed. The report opens by saying the problem began at 11:20 UTC; core traffic was largely flowing again by 14:30, and all systems were back to normal by 17:06. By my count, that’s about 5 hours and 46 minutes from start to full recovery. The report also stresses that it wasn’t caused by a cyberattack.
One detail from this outage is worth any beginner remembering: Turnstile broke too, and Cloudflare’s dashboard login page uses Turnstile, so most people couldn’t even log in to the dashboard at the time. My inference from that: when something really goes wrong, you may not be able to switch your records to grey cloud and route traffic around Cloudflare, even if you want to.
February 20, 2026 was much narrower, affecting a subset of customers using BYOIP (Bring Your Own IP). A cleanup task sent an empty parameter, the server read it as “all BYOIP prefixes,” and 1,100 prefixes were withdrawn, about 25% of BYOIP prefixes. It lasted 6 hours and 7 minutes in total, and engineers restored the last roughly 300 prefixes by hand. Ordinary free-plan sites don’t use BYOIP, so they weren’t affected.
I found both reports candid: the cause, the timeline and where judgment went wrong are all laid out. That’s part of what makes me more comfortable with Cloudflare. But it’s also a reminder that W3Techs’ 28.9% figure is equally a measure of how concentrated the risk is.
My verdict: who should use it, and how
Bottom line first: for personal sites, blogs, portfolios and small projects, I’d recommend Cloudflare’s free plan without hesitation. DDoS protection, a free certificate, the basic WAF rules, Tunnel, Turnstile and the Workers allowance are all yours without paying anything.
But there are a few things I’d think through before deciding:
- It doesn’t make your site fast just by being turned on. HTML isn’t cached by default, so a slow server stays slow. Real speedups take your own cache rules, and you have to be careful not to cache logged-in pages.
- It’s a single, concentrated point of failure. When Cloudflare goes down, your site goes down with it, and the free plan has no SLA and only community forums for help. If an hour of downtime costs you money directly, at least look at the Business plan’s SLA, or have a fallback ready that doesn’t go through Cloudflare.
- Switching nameservers is a deep commitment. Once all your DNS lives in Cloudflare, leaving means moving the records out one by one. And on Free and Pro, this is the only way to connect, so go in knowing that.
- It blocks traffic, not vulnerabilities. A WAF is just one layer of defense; your server, plugins and frameworks still need updating.
What would change my mind? If Cloudflare’s major outages became frequent, or if the free plan started cutting core features like DDoS protection and certificates, I wouldn’t recommend it this readily. As of my check in November 2026, the free list is still a long one.
Finally, if you’re setting it up for the first time today, I’d go in this order:
- Before adding the domain, screenshot or export every record from your current DNS, especially the email ones.
- If DNSSEC is on at your registrar, turn it off first, then change the nameservers.
- Proxy the website’s A, AAAA and CNAME records; keep MX, TXT and verification records on grey cloud; and don’t leave other subdomains that point at your web server on grey cloud, or they’ll leak its IP.
- Set the SSL/TLS mode to Full (strict) and install an Origin CA certificate or a regular public certificate on your server. Don’t use Flexible.
- Run
curl -Iand checkCF-Cache-Statusto confirm your static files showHITbefore deciding whether to write a cache rule for HTML. - If you have forms, switch to Turnstile; if you have home services to expose, use Tunnel instead of opening ports.
- Bookmark Cloudflare’s status page (cloudflarestatus.com) so you can check whether a problem is on its end.
Cloudflare has more features than one article can cover, but these are roughly what a beginner runs into on day one. For everything else, look it up in the docs when you actually need it.


