Local AI Animation: How Far an 8GB Card Gets You
Making AI animation on your own PC with ComfyUI and Wan2.2, with no cloud API fees: VRAM thresholds from the official docs, file layout, a batch script.
Cloud video generation is billed by the second. In the Seedance 2.5 piece I worked it out at $0.231 a second for 720p, so a 30-second clip rerun three times is $20. At volume the bill gets out of hand quickly.
The other route is to run open models on your own computer. You buy the hardware once and pay nothing more however much you generate.
That route is what this tutorial covered in August. Before rewriting it, I reread the official documentation for every tool it mentions, and found two problems with the original. First, it set the hardware bar too high, calling 24GB of video memory the “practical threshold”, which is not what the official docs say. Second, it never said which steps had actually been run.
So let me be clear first.
What I did for this piece: I checked the graphics card on my own machine, compared the official READMEs and tutorial pages of ComfyUI, Wan2.2, musubi-tuner, ACE-Step and GPT-SoVITS one by one, and wrote a Python batch submission script, confirming that it compiles and that its argument parsing works.
What I did not do: I did not install ComfyUI on this machine, and I did not generate a single video. The workflow below is a route map compiled from official documentation, not a record of my own operations. I mark which document each number comes from.
If you want a tutorial by someone who ran it all and shows generation times and results, this is not it. What it can do is help you judge before you start: how far your hardware will get you, and which documents to read.
What is ComfyUI, and why use it?
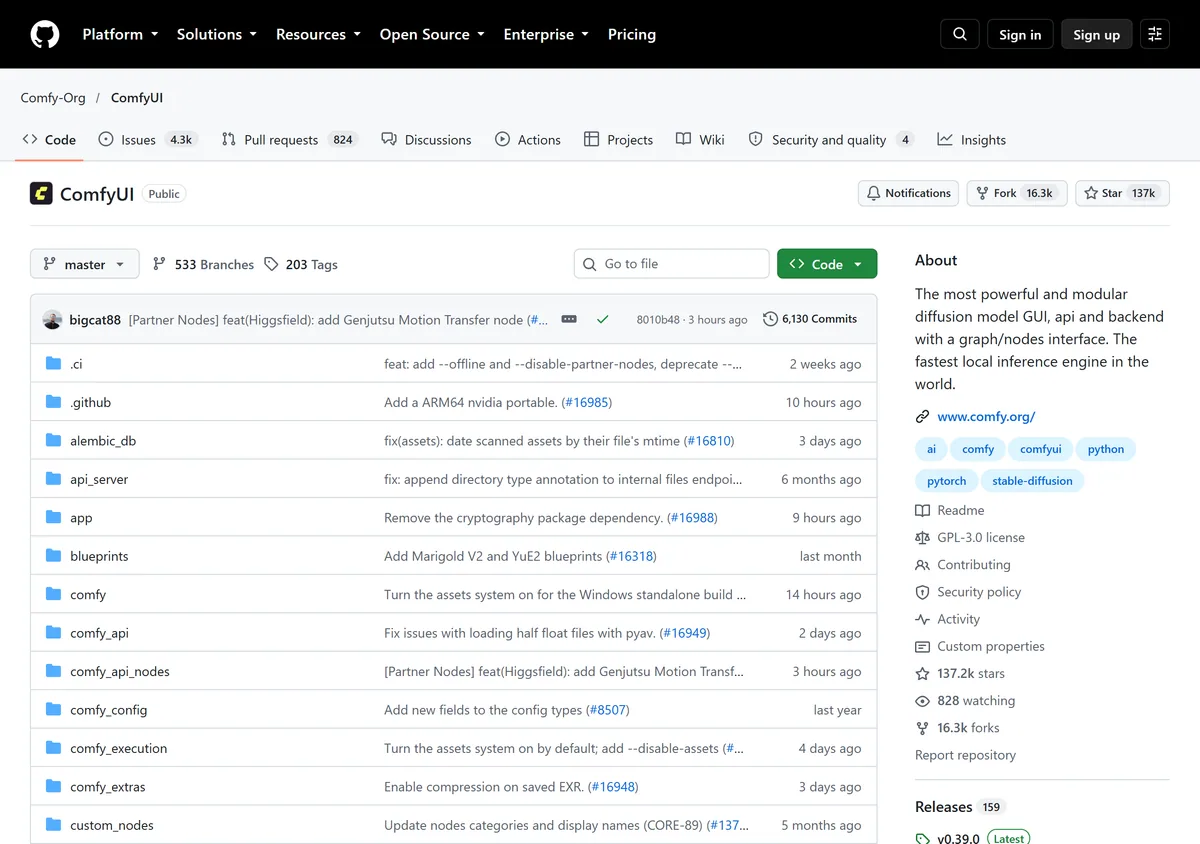 Figure: ComfyUI’s GitHub project page, captured October 2026 (source: github.com)
ComfyUI is an open-source graphical interface that wires each step of generation together as “nodes”. Loading a model is a node, entering a prompt is a node, sampling is a node, saving is a node. You connect them into a graph with lines, press run, and it follows the graph.
The project page describes itself as the most powerful and modular diffusion model GUI, API and backend. The license is GPL-3.0. The project now sits under the Comfy-Org organization, and the original comfyanonymous/ComfyUI address redirects there.
There are three reasons to choose it, each with a basis in the README.
It supports the most models. The video models listed in the README include Wan 2.1 and 2.2, LTX-Video 2 and 2.3, HunyuanVideo 1.5, CogVideoX, Mochi and more. Audio models include ACE-Step 1.5 and Stable Audio 3. So picture and music can be handled in one interface.
Workflows can be saved as files. The whole node graph can be saved as JSON, or restored from a generated PNG, seeds included. That means you can load someone else’s workflow directly, and put your own under version control.
It has a local API. That is the basis for the batch processing later.
The README lists four ways to install: the desktop app (Windows and macOS, recommended for most users), the Windows portable build, a manual install, and comfy-cli (pip install comfy-cli, then comfy install).
The recommended Python version differs from what the August piece said. The README now recommends 3.13 and says it is very well supported. If some custom node dependencies give trouble, fall back to 3.12. The Windows portable build ships with 3.13. The August piece’s “3.10 or later” is out of date.
Step zero: how much VRAM does your card have?
Do this before installing anything. Video memory (VRAM) decides which models you can load.
If you have an NVIDIA card, open a terminal and type:
nvidia-smiThis is the result on the machine I am writing on (header only, process list omitted):
+-----------------------------------------------------------------------------------------+
| NVIDIA-SMI 616.56                 KMD Version: 616.56        CUDA UMD Version: 13.4     |
+-----------------------------------------+------------------------+----------------------+
| GPU  Name                  Driver-Model | Bus-Id          Disp.A | Volatile Uncorr. ECC |
| Fan  Temp   Perf          Pwr:Usage/Cap |           Memory-Usage | GPU-Util  Compute M. |
|=========================================+========================+======================|
|   0  NVIDIA GeForce RTX 5060 Ti   WDDM  |   00000000:01:00.0  On |                  N/A |
|  0%   43C    P8              5W /  180W |    1042MiB /   8151MiB |      0%      Default |
+-----------------------------------------+------------------------+----------------------+
The cell to read is Memory-Usage: 1042MiB / 8151MiB.
The 8151MiB on the right is the total, so this is an 8GB card. The 1042MiB on the left is what is already in use. I was running nothing AI-related at the time, only a browser, an editor and a few background programs, and 1GB was already gone.
I only noticed this number this time. The spec sheet says 8GB, but if the card also drives your display, what is really available to a model is about 7GB. The thresholds in official documentation are all numbers that sit right on the edge, and this 1GB may be the difference between running and not running. Closing the browser before a run is the cheapest upgrade there is.
How much VRAM does each tool need?
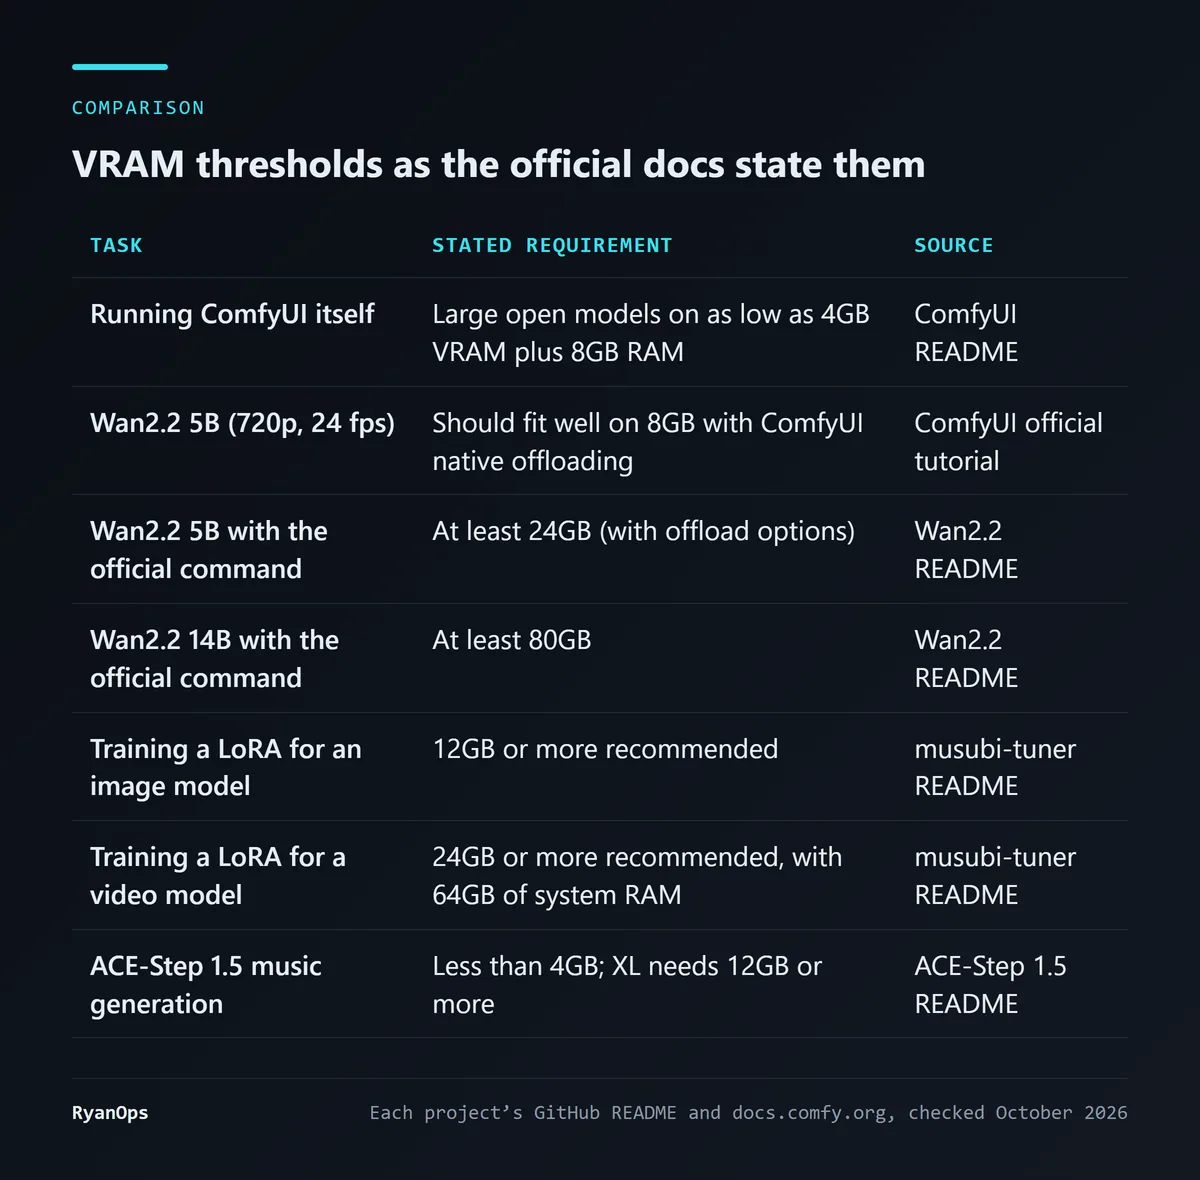 Figure: VRAM requirements as recorded in each tool’s official documentation (compiled for this article from each project’s GitHub README and docs.comfy.org, checked October 2026)
The hardware table in the August piece had one row: an RTX 3090 or 4090 recommended, with 24GB as the practical threshold. This table breaks it apart, because the bar differs a great deal by task.
The most confusing case is Wan2.2. Two official documents give two numbers for the same model.
Wan2.2’s own README says the 5B version “can run on a GPU with at least 24GB VRAM (e.g, RTX 4090 GPU)”, and that is with the offload options on. For the 14B versions the example command says “at least 80GB”.
ComfyUI’s official tutorial says something else:
 Figure: The note about 8GB in ComfyUI’s official Wan2.2 tutorial (source: docs.comfy.org)
“The Wan2.2 5B version should fit well on 8GB vram with the ComfyUI native offloading.”
Neither number is wrong. The difference is how you run it. Wan2.2’s README is talking about running its own command directly. ComfyUI has its own memory management, which moves the parts not needed at the moment to system RAM and brings them back when required. This is called offloading. The cost is speed, and the benefit is that small cards can run it too.
So the conclusion is: an 8GB card can try the 5B version of Wan2.2, provided it goes through ComfyUI. The 5B version outputs 720p at 24 frames per second. Wan2.2’s README says it can generate a 5-second 720p video in under 9 minutes on a single consumer-grade GPU. That time is the official statement for a 24GB card. I have not measured how much slower 8GB with offloading is.
The 14B versions give better quality, but 80GB is not consumer hardware. ComfyUI’s tutorial mentions community-quantized GGUF versions that lower the requirement, which is another path you would have to research yourself.
Training is a separate bar. If you want a video model to remember a fixed character, you train a LoRA. The musubi-tuner README recommends 12GB or more for training image models, 24GB or more for training video models, and 64GB or more of system RAM (“32GB + swap may work”).
That means an 8GB machine can generate but cannot train a character for a video model. It is the hardest wall on this route.
Where do the model files go?
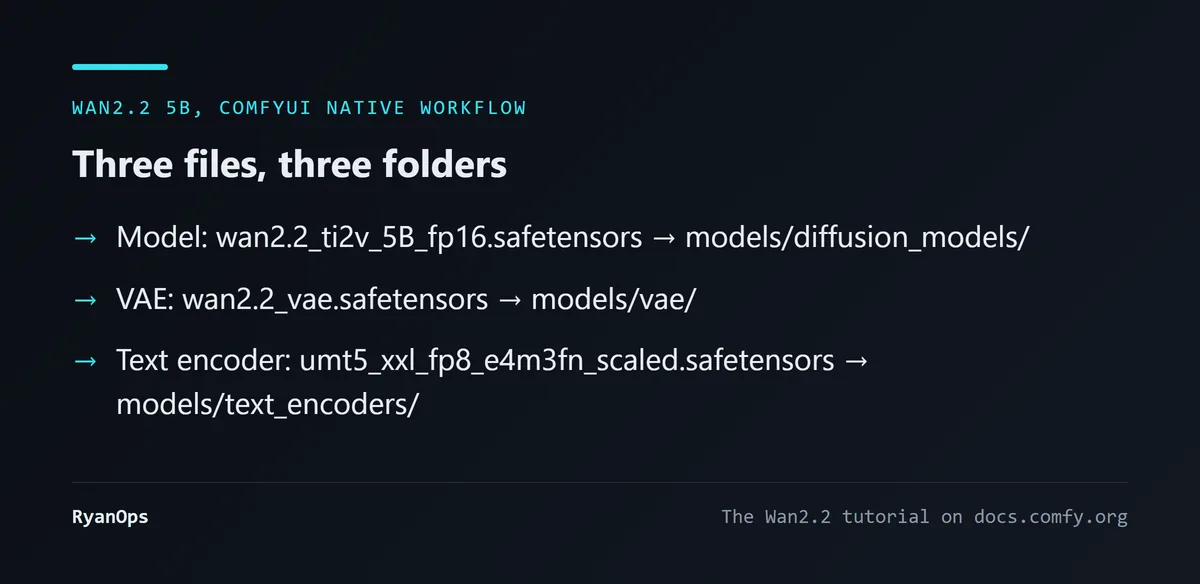 Figure: The files Wan2.2 5B needs in ComfyUI and where they go (compiled for this article from the Wan2.2 tutorial on docs.comfy.org)
This is where first-time ComfyUI users most often get stuck: the model is downloaded but cannot be selected in the interface. The cause is almost always the wrong folder.
The 5B version of Wan2.2 needs three files, in three places under the ComfyUI folder:
ComfyUI/
└── models/
    ├── diffusion_models/
    │   └── wan2.2_ti2v_5B_fp16.safetensors
    ├── vae/
    │   └── wan2.2_vae.safetensors
    └── text_encoders/
        └── umt5_xxl_fp8_e4m3fn_scaled.safetensors
The three files play different roles. The text encoder turns your prompt into a string of numbers. The model itself, guided by those numbers, turns noise into video step by step in a compressed space. The VAE finally restores the compressed result into frames you can see.
Mind the VAE version. The tutorial states it specifically: 5B uses wan2.2_vae.safetensors, and 14B uses wan_2.1_vae.safetensors. The two are not interchangeable.
With the files in place, follow the tutorial’s steps:
- Update ComfyUI to the latest version.
- Open the Workflow Templates and search for “Wan2.2 5B”.
- Load the template. If nodes show as missing, the version is usually too old.
- Adjust the size and the total frame count (
length) in theWan22ImageToVideoLatentnode.
For the first run I suggest turning both size and frame count down. The aim at that point is to confirm the whole path works, and a finished result can wait.
What are the stages of the whole process?
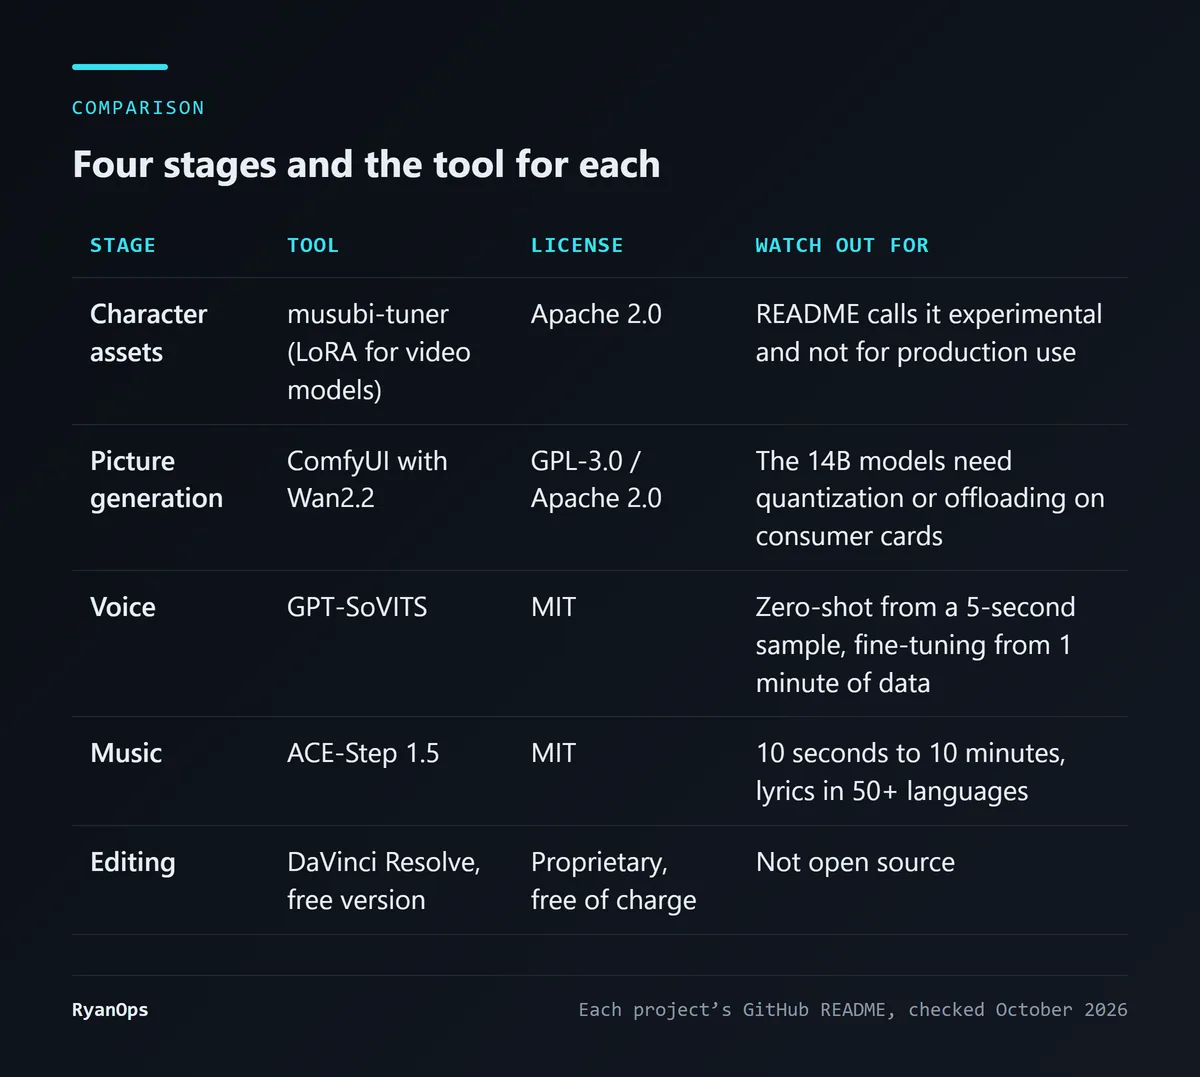 Figure: The four stages of a local animation workflow and the tool for each (compiled for this article from each project’s GitHub README, checked October 2026)
The August piece divided the process into four stages: building assets, guiding motion, rendering, and post-production. I still think that division is right. “Type a sentence and get a film” works for a few seconds of footage. Anything with a fixed character and a story has to be broken apart.
The stages follow below, with the emphasis on what each tool’s official documentation actually says.
Character: the same face in every shot
This is the stage that fails most easily. If one character looks different from shot to shot, the film falls apart.
The method is to train a LoRA for the character, a small set of additional weights that makes the model remember a particular appearance.
The tool depends on what kind of model you are training. For image models it is kohya-ss’s sd-scripts. For video models it is musubi-tuner by the same author, whose README lists support for HunyuanVideo, Wan2.1 and 2.2, FramePack and other architectures.
Two things to know. The musubi-tuner README says at the top that the project is “experimental and under active development” and “not intended for production use”, and that features and interfaces may change without notice. And as covered above, 24GB or more is recommended for training video models.
If your card has less than 24GB, a more practical alternative is Wan2.2’s image-to-video: first draw one image with the right character and composition using an image model, then have the video model start moving from that image. The 5B version accepts both text and images as input. Consistency of the character is guaranteed by that starting image, with no need to train the video model.
Motion: do not let the model improvise
The August piece advised blocking out motion and camera with a 3D mannequin in Blender, exporting a skeleton or depth-map sequence, and using ControlNet to make the AI follow it. It listed several community nodes: AnimateDiff-Evolved, IPAdapter_plus, Advanced-ControlNet, Frame-Interpolation and SUPIR.
I did not check the current state of each of those nodes this time, nor whether they fit Wan2.2’s native workflow. ComfyUI custom nodes change fast, and a combination that worked half a year ago may not work now. So I am not copying that list.
What I can confirm is the control Wan2.2 itself provides. The models listed in the official README include Animate-14B, for character animation and replacement. ComfyUI’s tutorial has first-last-frame generation (FLF2V): you give the first frame and the last, and the model fills in between. The latter is the simplest way to control motion and needs no 3D software. Both are 14B models, so an 8GB card would depend on quantized versions.
Sound: voice and music
Voice with GPT-SoVITS. MIT licensed. The capabilities stated in the README: a 5-second vocal sample is enough for zero-shot text-to-speech, and 1 minute of training data can fine-tune a closer match. It supports Chinese, English, Japanese, Korean and Cantonese. The README does not state a VRAM requirement.
Before using someone else’s voice, make sure you have the right to. Technically it takes 5 seconds. Legally and ethically it takes more.
Music with ACE-Step 1.5. Also MIT licensed. The README says it runs locally with less than 4GB of VRAM, generates a full song in under 10 seconds on an RTX 3090, handles lengths from 10 seconds to 10 minutes, and supports lyrics in 50+ languages. The XL version (4 billion parameters) gives better quality and needs 12GB or more.
This is the stage with the lowest hardware bar in the whole process. An 8GB card has plenty of room for the standard version. ComfyUI’s README also lists ACE-Step 1.5 among its supported audio models.
Editing: this step is not open source
The August piece’s description said “open-source tools throughout”. That is incorrect. The editor it recommended, the free version of DaVinci Resolve, is proprietary software: free of charge, but not open source.
This does not affect the goal of paying no API fees. It only needs stating plainly. If you insist on open source throughout, you can look for an open-source editor, which is outside the scope of this piece.
How do you make it run by itself overnight?
The biggest advantage of running locally is that you can queue. Drop in twenty shots before bed and collect the results in the morning.
Once ComfyUI is started it opens a service on your machine, by default at http://127.0.0.1:8188. The official example script shows how to send it jobs. The API here is a service on your own computer. It does not go through any cloud and costs nothing.
The steps:
- Tune the workflow in the ComfyUI interface until you are satisfied.
- Export the API-format JSON with “File → Export (API)”. This format differs from the ordinary save format, so this option is required.
- Open the exported JSON and find the IDs of the prompt node and the sampler node. The top-level keys of the JSON are the node IDs.
- Prepare a CSV with one shot per row.
I adapted the official example into a batch script:
"""Queue one ComfyUI job per row of a CSV shot list.

Usage: python batch_shots.py workflow_api.json shots.csv --prompt-node 6 --seed-node 3
The workflow must be exported with File -> Export (API) in ComfyUI.
"""
import argparse
import copy
import csv
import json
from urllib import request

SERVER = "http://127.0.0.1:8188/prompt"


def queue_prompt(workflow: dict) -> None:
    data = json.dumps({"prompt": workflow}).encode("utf-8")
    request.urlopen(request.Request(SERVER, data=data))


def main() -> None:
    ap = argparse.ArgumentParser()
    ap.add_argument("workflow")
    ap.add_argument("shots")
    ap.add_argument("--prompt-node", required=True, help="node id of the positive prompt")
    ap.add_argument("--seed-node", required=True, help="node id of the sampler")
    args = ap.parse_args()

    with open(args.workflow, encoding="utf-8") as f:
        base = json.load(f)

    with open(args.shots, encoding="utf-8", newline="") as f:
        for row in csv.DictReader(f):  # columns: prompt, seed
            wf = copy.deepcopy(base)
            wf[args.prompt_node]["inputs"]["text"] = row["prompt"]
            wf[args.seed_node]["inputs"]["seed"] = int(row["seed"])
            queue_prompt(wf)
            print("queued:", row["prompt"][:40])


if __name__ == "__main__":
    main()
The CSV looks like this:
prompt,seed
"a girl walks through a rainy street at night, neon signs",101
"close-up of the girl looking up, rain on her face",102
The script uses only Python’s standard library, so there is nothing extra to install. I confirmed on Python 3.10 that it compiles and that the --help output is correct. But I have not used it to send jobs to a real ComfyUI service, so try it with two rows first.
Two places where people trip.
Node IDs are strings in quotes, such as "6", not the number 6. The script reads them from the command line, so they are strings already.
The field names under inputs depend on the nodes you use. In the official example the prompt node is CLIPTextEncode with a field called text, and the sampler node’s seed field is called seed. If the Wan2.2 workflow uses different nodes, the field names may differ. One look at the exported JSON will tell you.
How many seconds before the card pays for itself?
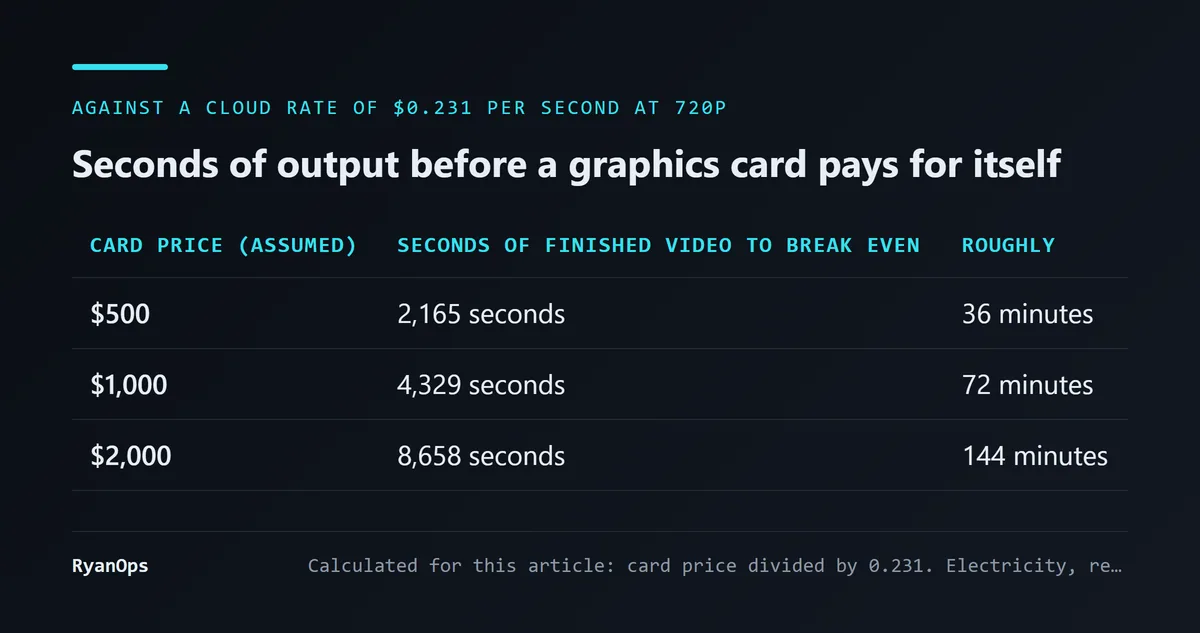 Figure: Seconds of output needed for a graphics card to break even against cloud fees (calculated for this article; electricity, reruns and time are not counted)
The August headline said “zero API fees”. That is correct, but it is easily read as zero cost. Hardware costs money, electricity costs money, and so does your time.
The arithmetic is simple: the price of the card divided by the cloud price per second.
As the baseline I use Seedance 2.5’s 720p price on BytePlus, $0.231 a second. The card prices in the table are three numbers I chose for illustration, not the actual price of any card.
A $1,000 card has to generate 4,329 seconds of finished video to break even. Seventy-two minutes.
Seventy-two minutes does not sound like much, but that is seconds of finished output. Both cloud and local need reruns. If one take in three is kept, both sides multiply by three and the break-even figure does not change. What really distorts the number is three other things:
- Quality is not the same. The 5B model that 8GB can run locally is not in the same class as a cloud flagship. Comparing their per-second prices directly overstates the local side.
- Speed is not the same. The official figure is under 9 minutes for a 5-second video on a 24GB card. With offloading on 8GB it takes longer. For 72 minutes of finished video the machine runs for dozens of hours.
- Your time. Setting up the environment, finding models, debugging. The first time will probably take a weekend.
So my judgment is: if you only make a few short clips now and then, use the cloud. You pay by the second and maintain nothing.
Local is worth it in one of three cases. You need a large volume, continuously. You want to experiment repeatedly without thinking about money each time you press generate. Or your material cannot be uploaded to someone else’s server.
My suggestions
If you have read this far and decided to try, this is the order I would follow.
- Run
nvidia-smifirst. Know how much VRAM you have, then see which paths are open. - Install the ComfyUI desktop app and run the built-in image template first. Confirm that the graphics driver, PyTorch and the interface all work. This step needs no video model download.
- Then download the three Wan2.2 5B files and run the official template. Small size, few frames. The goal is to see something move.
- Only once that works, tune quality, add sound and write batches.
The August piece ended by advising “make a 5-second pilot before thinking about anything longer”. I agree entirely, and would now put it more strongly: the first target does not even need to be 5 seconds. One second is enough. What you are validating is the pipeline, not the work.
What would make me revise this piece? Two things. If someone actually measures generation time and peak memory for Wan2.2 5B on an 8GB card, that is more useful than any official document I cite, and I will add it. Also, these projects update fast. ComfyUI’s README says a stable version comes out roughly every two weeks. Some of the file names, node names and version advice here will quite likely be wrong in six months. Before you start, go by the official documentation. The links are in the captions and the text.
What open weight means, and how it differs from open source, is in the glossary.
What this rewrite corrected
- The original did not say which steps had actually been run. This version states it at the top: the graphics card was checked, official documentation was compared, and a batch script was written and checked. ComfyUI was not installed and no video was generated.
- The original called 24GB of VRAM the “practical threshold”. ComfyUI’s official tutorial says Wan2.2 5B should fit on 8GB with its native offloading. The 24GB and 80GB figures are what the Wan2.2 README says about running the official commands directly. They are listed separately here.
- The original advised Python 3.10 or later. ComfyUI’s README now recommends 3.13.
- The original’s description said “open-source tools throughout”. The free version of DaVinci Resolve is free proprietary software and not open source.
- The original listed several community custom nodes as must-installs. Their current state and compatibility were not checked one by one this time, so only the Wan2.2 controls recorded in official documentation are covered.
- The original did not mention that musubi-tuner calls itself experimental and not intended for production use. That is added.
- The original said hardware is a one-time investment after which you “never pay another cent”. A break-even calculation is added, with notes on electricity, speed and the cost of time.


